
Construction articles
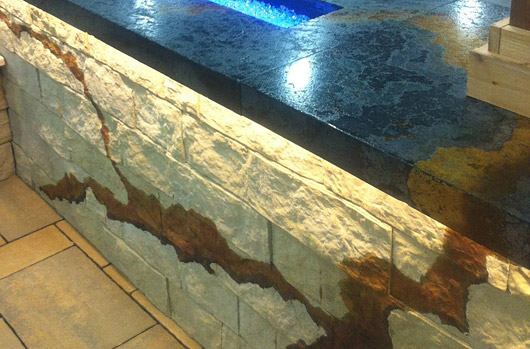
The mineral vein stain Chris created for the Anchor Wall booth at HNA 2014 continues onto the countertop.
Staining walls on purpose
By Tom HatlenLooking for something new and unique to offer clients? Consider applying decorative stains to retaining walls, countertops and pavers. Chris Becker draws upon 20 years of experience as a concrete artisan for techniques to transform hardscape products into unique works-of-art. He says there are a lot of concrete staining products readily available. It’s just a matter of learning about them and the techniques for applying them.
Chris is Product Designer and Project Manager for Anchor Wall Systems, Inc. Before that, he owned his own decorative concrete company for 12 years where he did stamped concrete, stained concrete and different types of castings for furniture, fire features and water features.
Chris says contractors get excited about the possibilities when they see the staining work his team has done at shows. But, he’s not aware of anyone else applying these techniques to retaining walls. Therein lies the opportunity.
Here are a couple of Chris’s unique retaining wall projects that incorporated stains.
Project 1: Anchor Wall’s 2014 HNA booth
Chris started the HNA booth wall by pre-assembling the wall and drawing the mineral vein design freehand. He used tape to mask off the area and applied stain with brushes. After peeling the tape off, he thought it looked stiff and artificial so he used a dremel tool (like a grinder with a tip the size of a pencil lead) to soften the edges.He says, like anything else, the first time you do something takes extra time. “For example, the HNA booth design probably took about 12 man hours. I did a 2nd one for another show, and it took about 2 and a half hours. Most time is spent just figuring out the technique and the process.”
The 2nd time went faster because he didn’t tape it off, allowed it to be more free-flowing and then touched it up just a bit with the dremel.
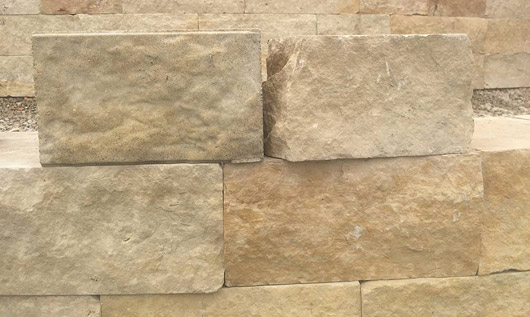
A single sculpted SRW block (center left) was stained to match the natural limestone that surrounds it. This was the first mock-up Chris created to show country club project decision-makers what could be done with stain.
Project 2: Country club wall
Chris was involved in staining a 3,000 sf retaining wall project to match the natural stone walls at the Olympic Hills Golf Club in Eden Prairie, MN. The country club had used limestone on the building and other areas of the project, but they didn’t have the budget to do the wall with limestone. The wall was prominently placed at the front of the site so it was important that it complement the rest of the project.Chris says, “One of the options was to create a custom color retaining wall block which coordinated with the stone, but which would've been less natural looking. The 2nd option was to stain the wall and create tones that were consistent with the natural stone.”
The 2nd option won hands down after the client saw the mock-ups Chris created.
How they did it
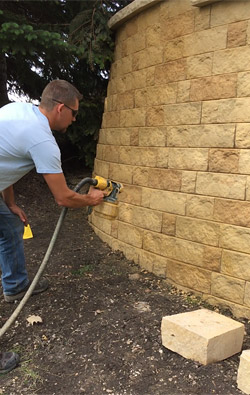
1. The wall was fully installed before staining.2. They applied the base coat with small airless sprayers to make the entire wall 1 color.
3. Then, the crew randomly stained individual blocks in different colors.
4. Lastly, the crew applied a blending coat, a very light overspray of a single color over the whole thing. When that wasn’t enough, they applied a 2nd blending coat. Chris says, “We took the base coat, which was the lightest of the colors, and just fogged it over the surface.”
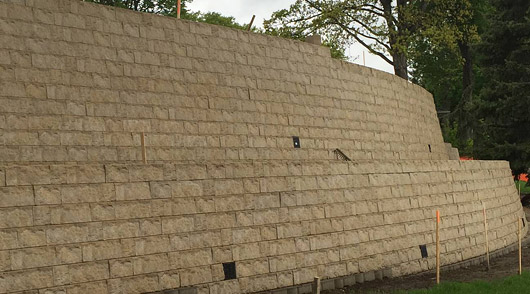
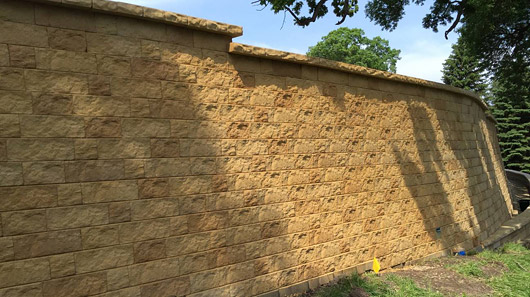
The country club wall before (top) and after staining.
Will the stain come off?
Before applying the 2nd blending coat they first tried power washing some of the color off. “We were shooting a high-powered truck-mounted power washer at point-blank range at a couple of blocks. It was actually removing the paste of the block before it would remove any stain. That convinced everyone the stain was on there to stay.”Novice crewmen
Chris says the crewmen who stained the wall were just typical hardscape crewmen who hadn’t been involved in staining before. He says they were able to do the job well using the simple processes he had used in his stamped-concrete business.Applying the base coat and blending coat wasn’t too difficult, but learning to randomly stain individual blocks with different colors took a little training.
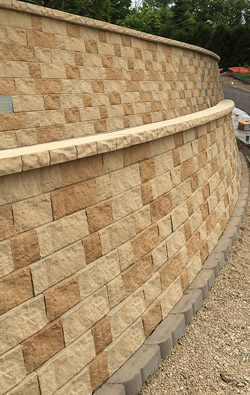 |  |
Individual blocks were stained different colors before a crewman applied the final blending coat, a light overspray over the stained blocks.
First off, Chris created a 6’ x 5’ mock up so the crew could understand what the finished wall was supposed to look like. “Then I said, ‘Okay, we've got 4 different colors we're going to use and there's 4 of us. As you each take a color, be mindful of doing about every 4th or 5th block, and just be random.
“‘So, if you're the guy with dark brown color, for example, don't do all the 16” long pieces. Make sure you do some of the 10s and some of the 6s. And always stand back and look at what you're doing.’"
Chris says the crew started off brushing the stain by hand though some switched to sprayers. “The material is so finely atomized that a bit of overspray was irrelevant. But it took the right person to have the accuracy with the spray gun to do that.”
While it took additional man-hours to stain the wall, Chris says the cost was still roughly 30% less than that of natural stone. And the finished wall looked great with the limestone.
“The architect, who was also the owner's rep, was there watching. And, as it went from a blank wall to the final mix, he was impressed when it absolutely matched the mock-ups.”