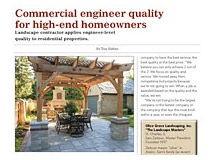

Contractor Stories
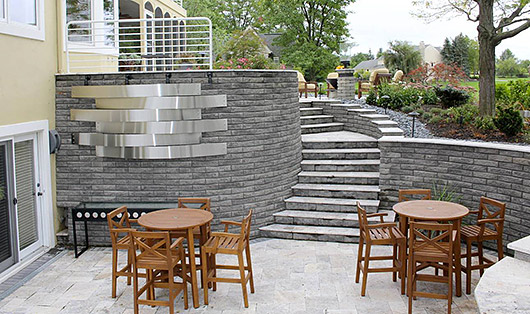
The clients wanted the more contemporary look of the low profile 4” retaining wall blocks that are typically used along with other block sizes as part of the random-pattern collection. The tall wall hides the crawl space for the deck. Because there’s a crawl space, the block cores of the upper courses are filled with concrete and rebar. Other courses are reinforced with geogrid.
The clients requested the stainless steel artwork on the wall from a design they saw on Houzz.com. Nathan drew it up and sent it off to a fabricator to make. Andrew says designing and hanging it was a challenge "because you're dealing with split face block, on a curved wall, and then a setback as well."
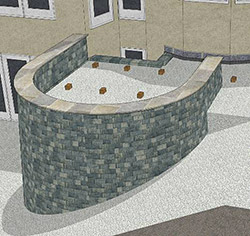
The drawing shows a view of the tall wall from the side. You can see the hidden wood-framed window and its window-well retaining wall as well as part of the decking posts. Andrew says, "We had to build the deck because of that window. We couldn't just build the retaining walls up and pack the gravel against the foundation of the house."
The clients requested the stainless steel artwork on the wall from a design they saw on Houzz.com. Nathan drew it up and sent it off to a fabricator to make. Andrew says designing and hanging it was a challenge "because you're dealing with split face block, on a curved wall, and then a setback as well."
The drawing shows a view of the tall wall from the side. You can see the hidden wood-framed window and its window-well retaining wall as well as part of the decking posts. Andrew says, "We had to build the deck because of that window. We couldn't just build the retaining walls up and pack the gravel against the foundation of the house."
Finding a way to build what the client wants
Designing and building a unique wall that also has a wall behind it and a deck above it while making the deck look like a patio.
By Tom Hatlen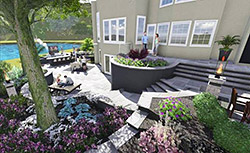
Nathan uses SketchUp software to create 3D designs for client presentations. “People who aren’t in construction can’t visualize what it will look like from a set of plans. People do relate to 3D 100%. If they can see it they get it, done deal.”
He says he spends almost as much time drawing the client’s house as he does their landscape so clients feel they are viewing their own property. Putting people in the 3D designs helps clients visualize themselves enjoying the space. “They’ll say, ‘Hey, there’s me’ or ‘There’s you.’ They have fun with it.”
The design shows 1 of the 2 large locust trees retained from the previous landscape. Andrew says they always bring in a consulting arborist when their work could potentially damage a tree. The arborist advised them to fertilize in the fall before construction, but also said he wasn’t concerned because locusts are very hearty which is why they’re often used for street trees.
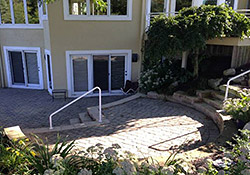
Before: The previous hardscape included a 2-tiered patio in the lower area. The upper tier was maybe 35% of the space and too small to use for much. There was a large crawl space (with the now walled off window) beneath the old deck. There was no tall wall, and no fire pit patio. The large staircase led to a walkway and a previous deck to the house. All was rundown and not in the style the client wanted.
Retaining wall backfill will butt against the reinforced deck joist to add stability. Fill behind the joist will slope down to the yet-to-be-built window-well retaining wall protecting the wood-framed window below the deck.
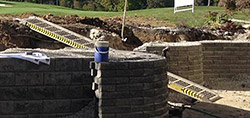
The crew uses moving truck ramps to walk or push a wheelbarrow down to excavated areas. The ramps are sturdy with excellent grips/drainage for muddy sites.
Andrew Hedge says his company sends out postcards several times a year to areas with high property values. “We go after the big jobs. We can access to the entire county on a spreadsheet. Then sort them by area."
A single postcard led to this $175,000 project and to a referral for a comparable job at a neighbor’s house.
We can do that
While it’s hard to say just what the client didn’t like about previous designs, here’s what went into the winning design. Project designer Nathan Graham explored new ground and challenged the installation crew to find a way to give the clients what they wanted. And though it turned out to be more of a challenge than he thought, he trusted Andrew would find a way to build it.The clients had found a number of photos on Houzz.com that showed specific outdoor room elements and styles they liked. It was just a matter of thinking outside the box to find a way to build it.
The clients liked the idea of a tall retaining wall to hide the big crawl space under the deck. Problem was there was a wood-framed window down there that couldn’t be blocked off and covered with fill. So Nathan devised a plan to build a window-well retaining wall hidden behind the large wall.
Project Profile
Yates Residence, Westerville, OH2014 HNA Project Award Winner – Residential Segmental Retaining Wall
Design/build contractor
Hedge Landscape, LLCAndrew Hedge, President
Nathan Graham, Project Designer
Blake Hedge, Project Manager
Project value
$175,000In-house work
Retaining walls (900 sf)Travertine paving (1,600 sf)
Silca deck system
Steps, pillars, kitchen, wall art & fire feature installation
Underground drainage
Electrical & low voltage lighting installation
Plantings, sod & Mexican beach pebble installation
Demolition & excavation
Custom railing fabrication
Work done by others
Gas line installationWall art & kitchen stainless steel fabrication
Audio/visual equipment
Irrigation system relocation
Year completed
2014With the walled-off window still open at the top, Andrew says the area above it had to be built as a deck. But the client wanted travertine. Nathan searched online and found the Silca System that allows you to pave over a deck. And, with some modifications, they got it done.
There’s still a good-sized crawl space below the deck. So, how do you have a crawl space behind a tall wall? They used a combination of poured concrete and rebar in SRW block cores and multiple layers of 2”x12” deck floor joists to hold back the load.
The clients wanted a more contemporary look in the retaining wall with low profile 4” blocks and more lines. But it turned out the 9”-wide blocks Nathan specified weren’t available. Going with the next size, 4” high x 18” wide, meant they would have to grind about 3” off of the back lip on each side to make the tight curves.
Andrew says the homeowner was easy to work with and understood the need for changes when building complications occurred. “We always go the extra mile to make a project look great. We just went ahead and did it. We just knew it was going to be an awesome project.”
The construction process
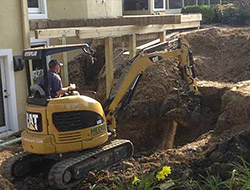
1. First, they demoed the existing deck, hardscape and plant materials, and began excavation.2. Once done excavating, they built dirt ramps so they could use skid steers to haul as many materials down to the lower area as would fit.
3. Then they installed the deck footers, posts and basic support structure. With the deck to be positioned above the tall wall, they wanted the posts in before the wall went in so they wouldn’t be augering down into backfill.
4. Next they built the walls followed by the big staircase.
5. They finished out the lower patio drainage work which connects to the existing downspout drains that carry water out to a pond.
6. Then they dry-laid the travertine and built the outdoor kitchen area.
7. Finally, they built the Silca System deck and steps up to the deck.
 | 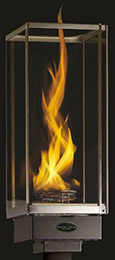 |
The homeowners own a gas line installation company and wanted gas products well represented on their property. To support 5 gas torches, a gas fire pit, pizza oven and grill they had to upgrade the service to the property. At $900 each, the Tempest Torch lanterns from Travis Industries produce a tornado-like effect.
The sunken patio provides a degree of privacy from a wide-open golf course. The sun-design cabinet in the gravel above the grill holds a 65” water-resistant outdoor TV that emerges from the top of the cabinet by remote control.
The sunken patio provides a degree of privacy from a wide-open golf course. The sun-design cabinet in the gravel above the grill holds a 65” water-resistant outdoor TV that emerges from the top of the cabinet by remote control.
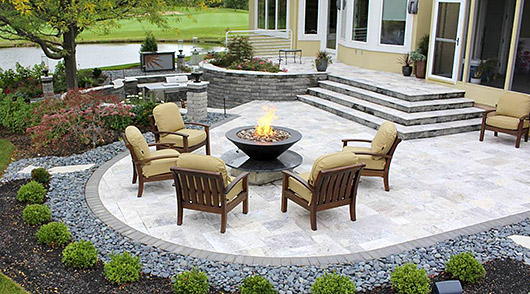
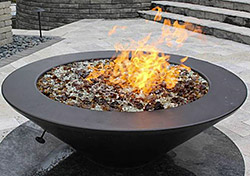
Nathan placed the fire pit on the wide-open upper area because it would be used in the evening when no one is golfing, so there’s no privacy concern. The Silca System deck provides a transition from the indoor kitchen down to the fire pit patio while maintaining the continuity of 1-1/4” thick travertine throughout the project.
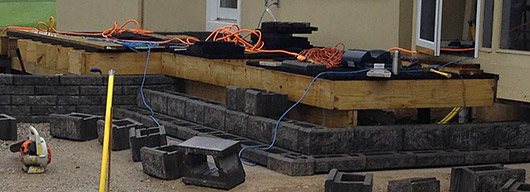
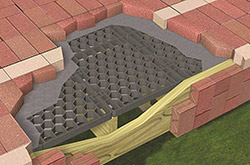
Andrew says installing the Silca System on the deck was an interesting learning exercise. “It took awhile to figure it out. You want to make sure your joist spacing is good. If it’s off, you just add some blocking to match the width of the Silca grids. I’d use it again for sure.”
The first 3 steps up to the deck are a free-standing wall built from 8” blocks. While the last riser to the deck surface looks like a course of 8” block, it is just a veneer created by cutting the face off blocks and gluing them to the deck rim joist. The cores of the blocks were filled with concrete to provide a surface to glue travertine.