
Construction articles
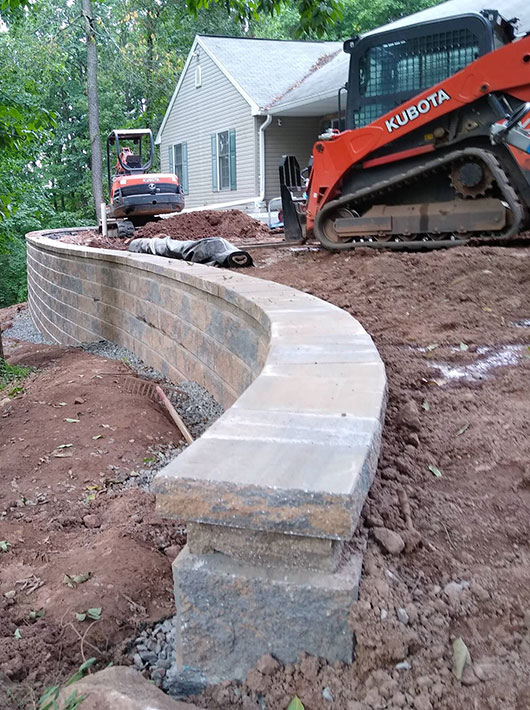
Keep heavy equipment back from wall.
Get smart about building walls
By Jeremy MartinRetaining walls are unforgiving. If they fail, they are not an easy repair like concrete pavers typically are. They are extremely expensive and labor intensive to rebuild. If they overturn or settle, you’ve got to tear it down to the base course.
Worse yet, in the event of catastrophic failure, there can be property damage and personal injury. Google “catastrophic SRW wall failure”; I don’t recommend doing it if you’re in a middle of a large wall project unless you don’t mind some lost sleep.
So, if you’re estimating a retaining wall, how do you determine the correct method? And when do you consult an engineer? The answers are found through in education.
For starters, take the NCMA SRW Basic Installer course. It’s only 1 day. It’s the most poorly attended course I teach, which is a shame; again, walls are very expensive to repair!
10+ years getting better
I’m confident in our designs and our build processes because we’ve taken the time to educate ourselves over the last 10+ years and build that confidence. We’ve only had minor issues even as we have taken on more and more complex projects.- 2008 – we went for NCMA and ICPI certifications.
- 2012 – I put an even greater emphasis on education. We were average and I knew it. I didn’t want to stay there. I started attending EP Henry’s MAHTS show and Techo-Bloc Showcases, both of which had tremendous educational value.
- 2013 to 2015 – I doubled down on education. I was taking my crew along to all the events. I took the ICPI Advanced Residential Paver Technician course (now Residential Specialist). During these years, our designs and scope of work were advancing quickly.
- 2016 – I went to Hardscape North America for the first time, and took my instructor training. In the years since, I’ve continued to grow both my installation and instructor skills.
Wall is keyed into pillars for strength. Due to free standing height, cement treated base was used.
During those years of rapid growth and education, I would often tell my crew, “You know, a year earlier we couldn’t have built this.” Each project was a building block, and each year we advanced our skills.
We were truly in the industry, meeting new people and learning new trends and techniques. We started overbuilding our projects, specifying more reinforcements than required. We learned more and more about geo-synthetics.
We also learned by leaning heavily on our supplier for tips, and as I made friends and contacts in the industry I tapped them when needed. (Thanks, Bill Gardocki, for answering my questions about a poolside patio back in 2014. That project made it to the front cover of Hardscape Magazine!)
Here’s some of what I’ve learned and what I teach.
Wall construction basics
- A 6” thick, well-compacted gravel base is a great place to start. Make sure it extends a minimum of 6” in front and behind the base course. For a 12” deep block, that means a 24” wide base. While not required by NCMA, I highly recommend geo-textile separating subgrade and base material.
- Bury the base course a minimum of 6”. More embedment is required for weak soils, tall walls, tiered walls, surcharges or excessive crest slope (above the wall) or toe slope (below the wall).
- Minimum of 12” of drainage gravel behind the wall (typically 3/4” or 1” angular aggregate with no fines), with perforated drainpipe daylighting every 40’ or connecting to a storm sewer system.
- Geo-grid as per manufacturer’s recommendations. If they have multiple scenarios for different soils, choose the weakest soils for an extra margin of safety. Length is always measured from the face of the wall, and the minimum is 48”. Never space runs more than 3 courses or 24” apart, whichever is less distance. Grid length should be 60% or greater of wall height.
- As a rule of thumb, never go more than 3x the depth of the wall unit in a gravity wall system (which has no geo-grid). Using a wall block that’s 10” deep? Don’t build more than 30” high without grid, and include the base course in the 30”.

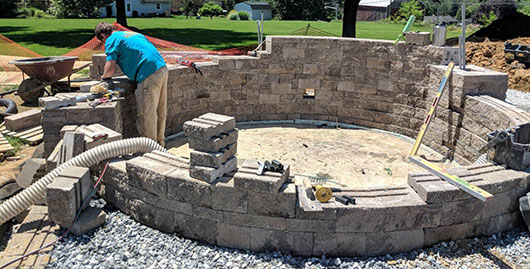
Miragrid 5XT uni-axial grid. Use smaller compaction equipment within 3’ of the wall.
Solving issues beyond the basics
- Steep toe slope. If you measure out 5’ level from the face of the wall, there should still be 6” embedded. So, if the grade slopes 12” in that 5’… then you better be burying 18”!
- If subgrade seems unstable, increase base depth. You could also consider increasing width, as well as using cement treated base (CTB) or geo-grid reinforcement in the base to create a more rigid base.
- Are you pushing the margins in order to use the type of block the client loves? Overbuild it… instead of 12” of drainage stone, increase it to 36”. It will allow for faster compaction and increased drainage to prevent hydrostatic failure and minimize movement with freezing temperatures.
- Worried about the height of the wall or the stability of the onsite soils? Besides extra drainage stone, increase grid length and decrease vertical spacing. Place it every 6” to 12” rather than 18” to 24” between runs.
- Using a wall system with block that is less than 12” deep? Use a larger, more stable wall block for the footer course. Then switch to the desired block above grade.
- Per International Building Code, municipalities must require a stamped engineered drawing for any wall system over 48”. Some municipalities disregard it; others require it for a wall as small as 18” high! If the stamped drawings are required, don’t try to game the system and skip permits. It’s not worth the legal nightmare that could ensue.

Compacting subgrade is critical. It removes air and creates a denser subgrade with higher strength.
Dealing with engineered walls
You already know you need an engineer’s blueprint to build the wall. Perhaps the municipality requires it, or it’s far enough out of your wheelhouse that you need some reassurance that you’re not building a failure. But how do you bid the wall if you don’t know what the specifications are? What if the client doesn’t want to spend $2,000+ for the engineer, because the project may exceed their budget?- Pre-bid the project using the most aggressive standards you can find. Specify grid length equal to height of the wall. Present this to home owner with the caveat that the cost could change depending on engineer’s requirements.
- To make step #1 more accurate, contact an engineer with details of the project. Include project location, soil type, type of block, toe and crest slopes, surcharges, and height. Ask him for approximate embedment and grid lengths. Also get estimated lead time for his drawings. Some engineers will be willing to do this, especially if you’ve already developed a relationship with them.
- After pre-bid approval, collect pre-payment of the estimated engineering fees.
- Adjust final bid as needed after engineered drawings have been received, and present to client for signatures.
In summary, I hope these tips help you build confidence in your SRW construction skills. However, this brief article is not a replacement for the NCMA installer course. Nor can the tips above replace an engineer’s services. Tips and methods may not be relevant to your area. There, that should keep me out of the headlines for being sued for a retaining wall failure in a Florida swamp or a Colorado cliff!
Jeremy Martin co-founded Willow Gates Landscaping in 2005. He became an ICPI instructor in 2016, NCMA in 2018. He also founded Dust Killer Tools to help his company meet 2017 OSHA silica standards. Email Jeremy@DustKiller.tools. Visit WillowGatesLandscaping.com and DustKiller.tools