
Contractor Stories
The wall no one else would bid
Bahler Brothers get creative in constructing a tall wall half way up a steep slope.
By Tom HatlenWhen they called Bahler Brothers, the homeowners already had a ready-to-go plan for an entertainment area above a series of existing retaining walls. They were looking for bids to build it.
While the homeowners were new to the property, the retaining walls were not. The walls were built 12 years ago when the house was built. Had the walls been constructed properly, they would have lasted for years to come.
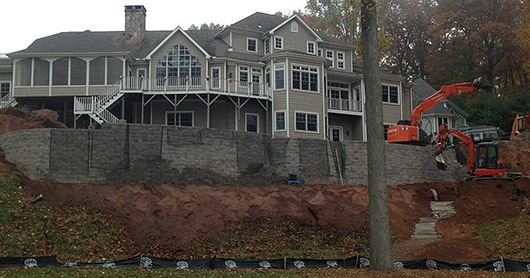
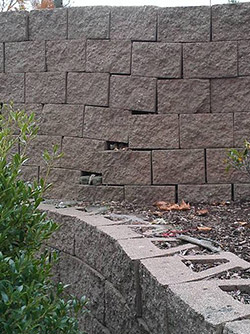
On his first site visit Project Manager Phil Bahler found a 13’ high wall system that wasn’t salvageable. There were no caps on the open core wall blocks, so water got behind the wall. Phil says, “The wall was separating pretty drastically on the curves and starting to push over.”
Later Phil discovered the original builder had also skimped on geogrid using maybe 1/3 what they should have. It didn’t go near deep enough into the hill, and it was laid something like every 6 courses when it should have been probably 3 courses.
Bahler Brothers designer Jen Kloter says, “We gave them an initial estimate triple what they had planned.” This didn’t go over too well, but the Bahler’s expertise in explaining the issues with the wall structure did. An independent engineer’s evaluation concurred with Phil’s.
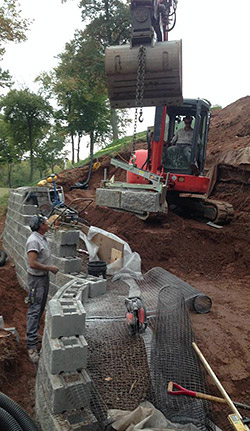
Geogrid from the old wall (upper right) holds the hill in place with less excavation while the crew installs the lower wall courses with new geogrid. The clamp is an attachment Phil invented and sells thru his other company, Pave Tool Innovators.
Months of design & redesign
The homeowners regrouped and hired Bahler Brothers to create a new design. Jen says the big challenge was finding a way to maximize the patio area to the client’s satisfaction while also getting engineering approval.The lawn sloped down 2:1 off the back of the house to the property line. Beyond that was flood plain community space and the Connecticut River.
Jen says, “The patio space was their only flat backyard. So they wanted the wall pushed out as far as they could. There were 3 or 4 different design revisions and 10 months of back and forth with the structural engineer and the geotech engineer, trying to figure out how to design a wall that would hold up.”
The structural engineer was concerned that the house 25’ back from the wall face could put pressure on the wall and collapse it. Managing water was another big concern. Jen says “There was so much water coming off that huge house. Plus the neighbor's yard was sloped above them so that everything was draining to this one area. We had to pipe out every scrap of water coming off that slope. That patio was actually built on spaghetti-like strands of drainage pipe.”
Phil adds, “That slope was unstable, so I can appreciate some over-engineering because that job would be an absolute nightmare if you ever had to get back in there to repair something.”
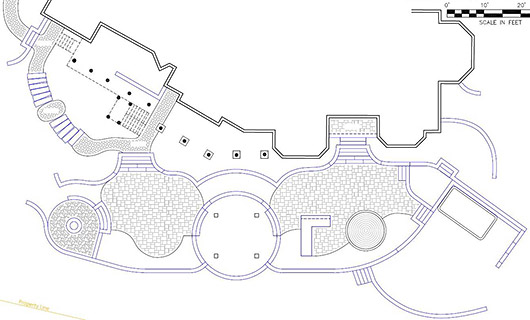
The final wall design added 200 sf of patio space by moving the wall face out 5’ and eliminating terraces. Jen kept the wall height down to 13’ (same as the old wall) by lowering the patio and adding steps at the house. They didn’t move the wall out further because the wall cost for each additional foot of patio space was becoming prohibitive.
Project Profile
Design/build contractor
Bahler BrothersSouth Windsor, CT
Designer
Jen KloterProject Manager
Phil BahlerSize of improved space
2,030 sf pavement1,590 sf walls
Project value
$300,000In-house work
ExcavationRetaining walls
Pavers
Fire pit
Outdoor kitchen aside from stone
Lighting
Work by others
Natural stoneGas hookups
Electrical
Irrigation
Fencing
Carpentry on pillars
Year completed
2014Out to bid again
With the design finally approved, the homeowners put the construction work out to bid, again. While that was disappointing, Jen says she had to be understanding since the price of the project had risen so much.But, in the end, no one else would bid on it. The combination of building a tall wall half way up a steep slope, following the engineers’ involved plans and jumping thru hoops to satisfy state and municipal shoreline building requirements proved too much.
Jen says their dealer talked to contractors who had been invited to bid. “He told them, ‘I know this project, I've talked to the project’s designer on it. You don't want to touch it.’ We got the job by default.”
Dump distance makes all the difference
In planning the job Phil saw that the first layer of geogrid was specified at 15’ deep to be laid on the 1st course of wall block. They would need to haul away somewhere around 500 yards of spoil. Finding a close dump site would be critical.“It was a huge deal. That was absolutely the difference between this job being a loss and being profitable. It could have been an utter disaster. So 2 of us spent time researching and calling and stopping by and talking to people. We'd even do some upgrades around their property if we had to.”
Phil found a fill site just 4 houses away. “That was really the sweet spot of this project. We saved probably 200 hours in trucking alone.”
Demo carefully
Removing all that spoil required planning too. Below the wall there was another 25’ of hillside before the terrain leveled out on the homeowner association property. The hill was too steep for an excavator to work on.All access to the site would have to come around the right side of the house because the left side was too steep. Part way down the hill they split out 2 access roads at different levels and demoed the wall in 2 different sections. Jen says, “We basically dismantled the existing wall while we were sitting on top of it.”
Excavators loaded spoil directly into roll-off dumpsters. When one dumpster was full and hauled away, an empty one took its place so the excavator could keep working.
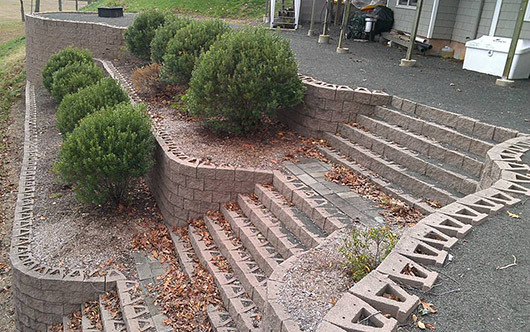
The original wall had been left unfinished which allowed water behind it. Hydrostatic pressure along with insufficient geogrid caused the wall to fail. The wall had 3 tiers which reduced usable space at the top. The new wall would be built out 5’ further with no tiers adding roughly 200’ sf additional patio space.
Construction with an absentee client
Construction began, progressed and ended with the client living in London the whole time. Jen says, “So, we communicated entirely through emails and phone calls. We built that entire wall without them here. That's why we have so many photos (about 500). We were giving them a daily update on what we were doing.“It was unsettling not having them here to walk through and give approvals. But, we didn't have much choice. They were anxious to get it going. And, they were comfortable enough with us doing it from afar. It all worked out.”
Dig deep
Wall construction began at the wall base that was leveled 2’ below grade. Not 2 blocks below grade – 2 FEET below grade to the engineer’s specifications. Jen says that when they took the old wall down, they didn’t remove the old geogrid right away. It was in the hill well enough to keep the soil in place and allow them to get away with a nearly vertical excavation.
They started the wall in August 2013 and completed it just after Thanksgiving. The following year they built the patios, the smaller walls at the top, fire pit and outdoor kitchen while a different contractor installed the natural stone.
This phase of the project was completed in July 2014. Future phases will include building a pergola in the dining area, adding more lighting and installing a 15’ x 8’ swim spa.
Jen says the homeowners now live in the house year-round. “They absolutely love their patio. They are out there with their kids using it almost every day. What more can you want than a happy customer?”
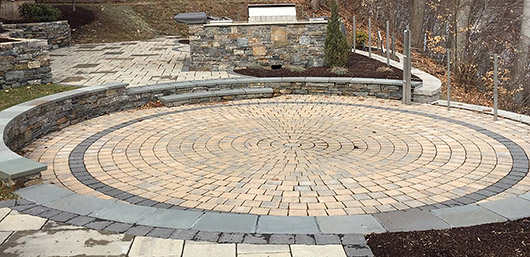
The homeowner didn’t want a drain visible in the dining area, so the center of the dining circle was installed as a permeable surface with drainage stone and a drain beneath it. Pavers were hand spaced to allow water thru the gaps.
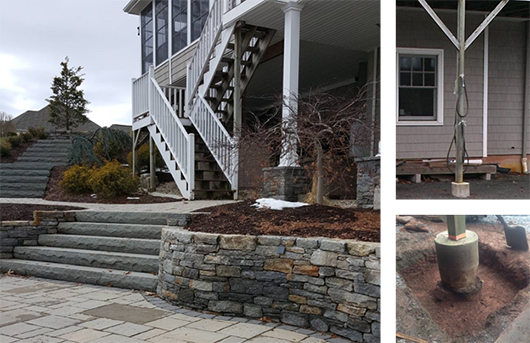
Jen reduced the height of the wall by adding steps (bluestone) from the house and dropping the level of the patio. The deck above was left in place, but Jen redesigned the support pillars. The crew formed the stone veneered columns over the existing concrete piers. They drilled holes into the piers, inserted rebar and poured concrete. Phil says, “We drilled in rebar on all 4 sides. Once it's poured all the way around there's really no way that can move.”
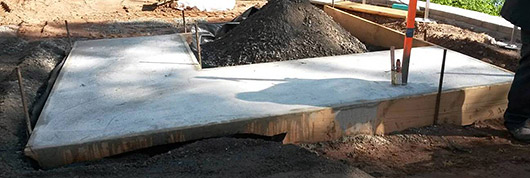
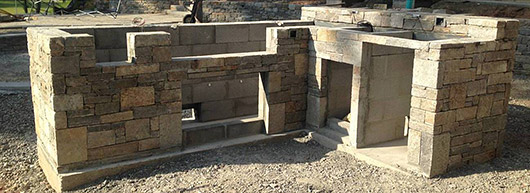
Bahler Brothers builds a lot of SRW block kitchens. When they build a mortared masonry block kitchen like this one, they install a rebar reinforced 6” to 8” thick concrete slab beneath it. That way, the entire structure moves together as a unit during freeze/thaw cycles. Mortar and countertops will crack if the sections are allowed to move independently. Jen says, “We will do that, even under an SRW kitchen if it has a 1-1/4” to 1-1/2” granite countertop. If the block below shifts even slightly there’s great potential for that granite to crack.”
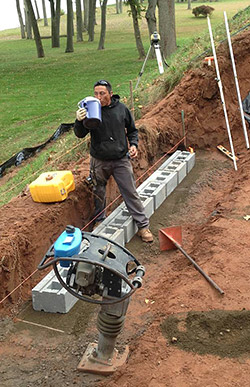
The engineer specified the base course to be buried 2’ below grade.
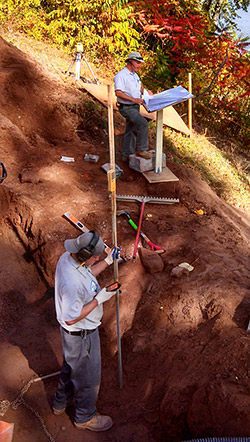
Phil says they use podium-like tables to hold plans on larger jobs. “Otherwise you're setting them in the dirt or on the gravel or on a pallet of wet block.” Here, Phil is passing information on to a crewman who’s setting elevations with a Telescopic Laser Rod. Watch the Laser Rod video at PaveTool.com to see how it works.
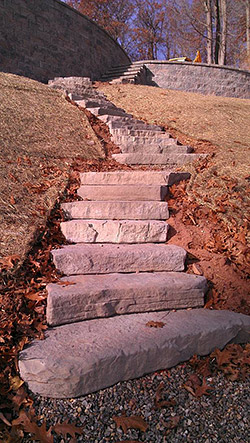
These manufactured concrete steps provide access to the riverfront. The steps end at the property line, but before the bottom of the hill.