
Contractor Stories
Building big walls on a shoreline
Dealing with regulations, risks and a steep slope along a water way.
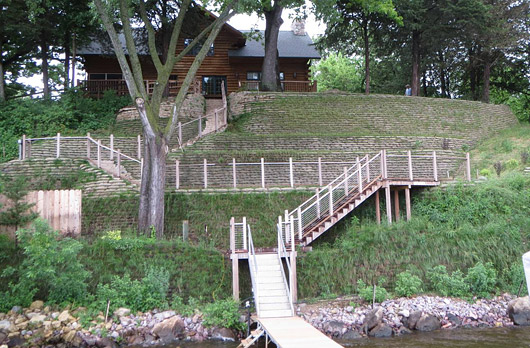
By Tom HatlenIn late July 2014 contractor Pat Dixon responded to a call to evaluate a series of timber retaining walls. Pat arrived to find a structure of 10 walls 50’ high and 120’ wide built a 1.1:1 slope above the Lake Wisconsin shoreline. A built-in timber staircase/walkway zigzagged down to the lake with switchbacks like a mountain road.
Pat says, “The walls were failing with several sections bulging and rotting. Insects were working overtime damaging the wood.”
After 2 hours inspecting the structure, Pat had to break the news: The walls couldn’t be repaired as the homeowner had hoped. The walls needed to be replaced. He says, “I was amazed the wooden walls were still holding. The homeowner and I were both taken back because of the scope of the project, the potential cost and all of the potential unknowns. We were dealing with tremendous forces of nature. And, we had never done a project this large before.”
Plantable soil bags from Envirolok were used to build the wall. Wisconsin regulations don’t allow most other wall options within 75’ of a lake shore. Pat hired a subcontractor to fill the bags though he owns a filling machine he uses for smaller jobs.
Project Profile
Property on Lake WisconsinDesign/build contractor
Dixon Shoreline LandscapingPortage, WI
Pat Dixon, Owner
Project value
Not availableTotal man-hours
9,000In-house work
Excavation6,000 soil bag wall units
45 RockSteps
Geogrid & earth anchors
300 cu yds fill soil
50 cu yds 6”-8” stone
15 cu yds 3/4” stone
17,000 2” native plant plugs
Hydroseeding
Temporary irrigation
Work by others
Stair railing Paver installation
Soil bag filling
Engineering
Year completed
2015 (irrigation and LED lighting to come)Pat wishes to thank those who made this project possible: RockStep/Norse Building Products, Agrecol Native Nursery, Race Engineering, Belgard, Miniconveyor, Gil Layton of Agrecol & NASECA, Columbia County WI Zoning, Wisconsin DNR, “but most of all the homeowner who understands the value of working with Mother Nature!”
Lots of shoreline walls
Pat has, however, done many, many sizeable shoreline walls. 90% of his business involves shoreline walls. With 2 more lengthy site visits, measurements, photos, sketches and an engineering firm’s 50’ deep soil bore test, the client felt confident Dixon Shorelines could do the job.Without going into the project’s price, Pat would say that it took about 9,000 man-hours.
He looked into different programs that had helped homeowners fund shoreline projects in the past. He checked with the lake association and with the local land and water conservation department. No funds were available.
Fortunately, the clients had the means to cover the project themselves. With a job this size where so much could go wrong Pat built most of the project on time and materials.
Limited wall options
Much had changed in the 18 years since the timber wall was built. As the homeowner sought out options, the county zoning administrator made it clear that the wall could not be replaced with a new timber wall – or a poured concrete wall, or a natural stone wall, or even a segmental retaining wall.Pat says projects like this that are within 75’ of a Wisconsin shoreline’s ordinary high water mark must be “naturalized,” planted to blend into the hillside with minimal visible structure. Pat had used the Envirolok soil bag system to satisfy this requirement many times before. The zoning administrator approved it and the client agreed to it.
Envirolok bags loaded with 1.25 cu ft of sand and soil equal 1 sf of wall face. The bags are made from polypropylene geosynthetic non-woven fabric that doesn’t rot, tear or allow sediment through the fabric. They spread enough to allow root growth for hydroseeding and/or plant plugs placed in the gaps between bags. They also allow moisture to seep through though Pat still installs perforated drain tile behind the wall for insurance.
Timber walls above the work area were left intact to stabilize the hillside while the new wall was constructed. Every 2’ of soil bag wall was reinforced with geogrid folded over a piece of 3/4” rebar which was then secured by earth anchors driven 12’ to 14’ into the hill. 2 connection pins per soil bag provide shear strength to the wall.
The earth anchors were placed 6’ apart. With no access for larger equipment, they used a 120 lb electric jackhammer to drive 4’ sections of 3/4” rods into the hill and feed the earth anchor cable in. “We created special couplings with number 10 threads. We put 4’ sections in at a time. Then we would have to put a coupling on and drive another 4’.”
The earth anchors were placed 6’ apart. With no access for larger equipment, they used a 120 lb electric jackhammer to drive 4’ sections of 3/4” rods into the hill and feed the earth anchor cable in. “We created special couplings with number 10 threads. We put 4’ sections in at a time. Then we would have to put a coupling on and drive another 4’.”
Building around trees
While regulations determined the type of wall built, Pat says placement of the wall was determined by the location of 2 large trees the homeowner wanted to save. A 5’ wide white oak tree and a 20” diameter red cedar tree were only 6’ back from the timber wall, one on each side of the stairs. The trees’ roots would need all of that 6’ so the new wall would have to be built at the same slope as the existing wall.“We had to work 6’ out from the oak tree and dug 6’ down. Basically the tree was on an island for 2 years before we filled it all back in.”
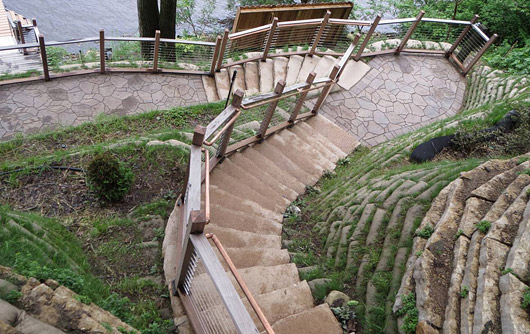
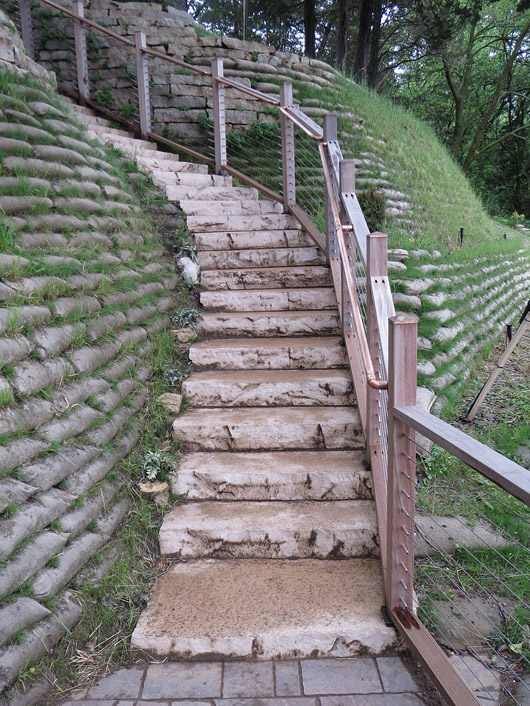
Following the stairs
The new stairs follow the path of the old stairs. Lake access was a primary concern for the homeowners. They liked the route of the timber staircases and walkways, and very much wanted the new construction to follow the same route.Pat says they were very fortunate Columbia County zoning regulations allow in-ground stairs. Other counties might have required the entire hill be naturalized with stairs built on risers above it.
“With a 1.1:1 slope, there was no way we could do an over-the-ground stair even if you started flush at the top. The elevations were just unreal for the rise and run to meet the building safety code.
“The biggest concern with in-ground stairs is they can create a path for concentrated stormwater runoff. We've never had an issue of stairs washing out because we use geo polypropylene non-woven fabric under each stair when we put them in the ground. We literally do not lose any sediment or soil at all.”
 |  |
The stairs are built from RockSteps, a lightweight manmade product. The 48” x 18” x 6” size they used weighs about 150 lbs, 1/4th the weight of natural stone. Pat’s been using RockSteps for 5 years, “We no longer install natural stone steps unless it’s a special request. The RockSteps look just like real stone. They're very, very good for inaccessible spots on hillsides where you can't get any equipment in.”
The crew slid the steps down to the work area on 2x4s where 2 men could carry them and maneuver them into place. “It would probably take 1.5 to 2 hours to set each natural stone when you can set these in 30 to 45 minutes. You're not going to have to worry about a guy hurting his back or smashing fingers.”
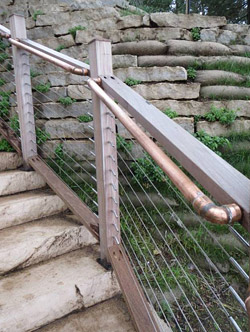
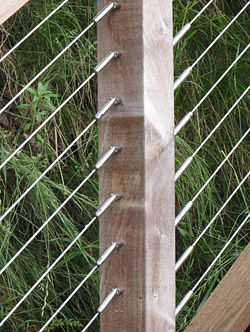
The railing system was custom designed for the project by a subcontractor. The posts are built from Epi, a dense tropical hardwood with minimal warping. The post caps and hand rails are copper. Pat says the stainless steel cable does a tremendous job of stabilizing the railings and will last a lifetime.
The crew slid the steps down to the work area on 2x4s where 2 men could carry them and maneuver them into place. “It would probably take 1.5 to 2 hours to set each natural stone when you can set these in 30 to 45 minutes. You're not going to have to worry about a guy hurting his back or smashing fingers.”
The railing system was custom designed for the project by a subcontractor. The posts are built from Epi, a dense tropical hardwood with minimal warping. The post caps and hand rails are copper. Pat says the stainless steel cable does a tremendous job of stabilizing the railings and will last a lifetime.
Draining the top first
Before starting any work on stairs, walkways or wall, Pat’s crew needed to ensure all stormwater off the top of the hill was directed away from the project.“Every project that we do, that is always the number one thing that I look at on the walk-through with the homeowner. 90% of the time it's an issue. We want to make sure that we're going to address that long-term, but also short-term. We don't want our work to wash out.
“On this particular job, the homeowner already had the proper downspout and gutter sizes to handle an average 1” to 2” rain. They had drain tiles off the downspouts that were going off to the side of the property. That was a great help right there.”
Even so, they cut a 50’ long French drain at the top of the hill 2’ deep by 2’ wide with perforated drain tile that moves rain water off to the sides away from the wall.

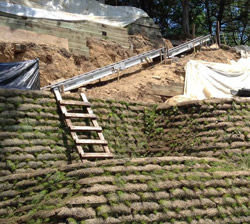
An 8’ wide access road down a 40° slope worked fine thru the 1st autumn of the project. Then they covered the hillside with plastic for the winter. In the spring the hillside was so dry that the sandy soil wouldn’t hold together and allow machinery to get any traction. Pat found this out when the mini excavator he was driving slid halfway down the access road to the last course of soil bags.
That was the end of that. The next day they purchased 80’ of mini conveyors (4 sections 20’ each) to move materials. The homeowner helped pay the cost. Pat says, “This was the best thing that we could have done to tackle this giant hillside project. It made the process safer and faster.”
That was the end of that. The next day they purchased 80’ of mini conveyors (4 sections 20’ each) to move materials. The homeowner helped pay the cost. Pat says, “This was the best thing that we could have done to tackle this giant hillside project. It made the process safer and faster.”
Demoing & building & demoing & building...
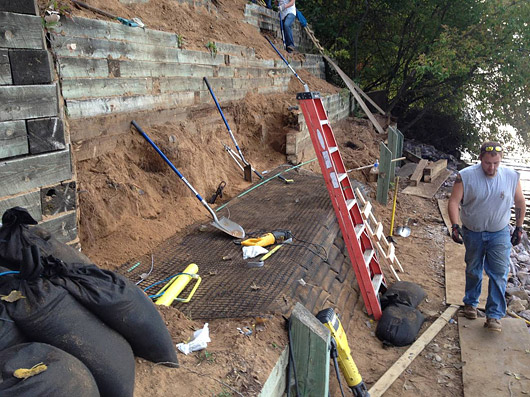
With water issues from above handled, they began hillside construction in late August 2014. They started by beefing up the boulder rip/rap at the base of the hill to protect the shoreline and to provide a good solid base for placing soil bags. The crew installed 50 cu yds of 6” to 8” granite quartzite on top of the existing 24” granite boulders. On top of that 15 cu yds of clean 3/4” stone was installed and leveled.From there, they started demoing – and building. They didn’t remove the entire old wall before building the new wall. If they had removed all the timbers on the unstable slope, they might have had an earthen avalanche from above.
Instead, they progressed terrace by terrace in 20’ wide sections. They would demo a section of old wall and rebuild that section while much of the upper timber walls remained intact. The exception to this was a sizeable area of the upper walls torn out to make room for an access road.
In order to remove the timbers safely, the soil behind the walls had to be removed using picks, shovels and grub hoes. The crew then stacked and pinned soil bags. Every 2’ high they installed a piece geogrid into the hill 3’ to 5’ deep. The geogrid was twice that depth (6’ to 10’) so they could and fold it back over a piece of 3/4” rebar sandwiched in the back. Earth anchors driven 12’ to 14’ further into the hill secured the rebar every 6’ laterally.
By November 2014 they had finished the bottom 15’ of wall and needed to wrap up for the winter. The crew installed 2” native plant plugs in the gaps between soil bags, and then hydroseeded a cover crop of native seed mix over the top. Then they installed erosion control measures for the winter including erosion control blankets, wood fiber sediment logs, SiltSoxx, straw blankets and silt fence.
Lastly, the crew covered the entire 120’ x 50’ hillside with plastic sheeting for the winter. (During construction, they also covered the hill with plastic every time it rained.)
In April 2015 they started back up after a mild winter with no erosion issues. They continued to the top installing walls, stairs and walkways finishing up in October 2015. Pat says next they’ll be installing irrigation and some extensive LED lighting.
But, for him, it doesn’t end there. “On all of our projects we go back periodically to make sure we don't see anything out of place, that there’s no settling. We want to know how these projects are doing year after year. All our customers end up being lifelong customers. Our devotion to follow up is what really helps us build our reputation. I love what we do, and appreciate our customers.”
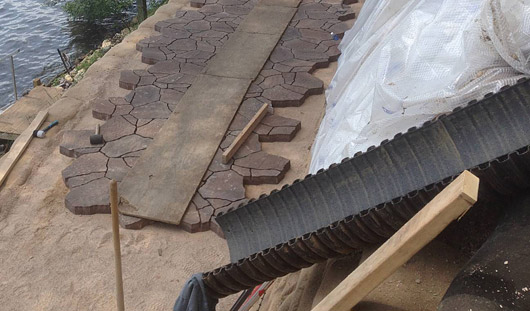
They used 24” PVC chutes bolted together to send materials like sand, stone and plant plugs down to the work area.